My Christmas Cheese Ball
It's Christmas time! What does that mean? Well, it means a lot, but one thing that it means is fun Christmas parties and high calorie finger foods. I love finger foods. They are tasty and pretty. I've made my cheese ball before for such events, but this year I decided to make it more wintery by making it look like pine cones. Since Ray did not want to buy a real Christmas tree this year (that's another story), I'm craving anything pine... this includes cheese balls that look like pine cones.
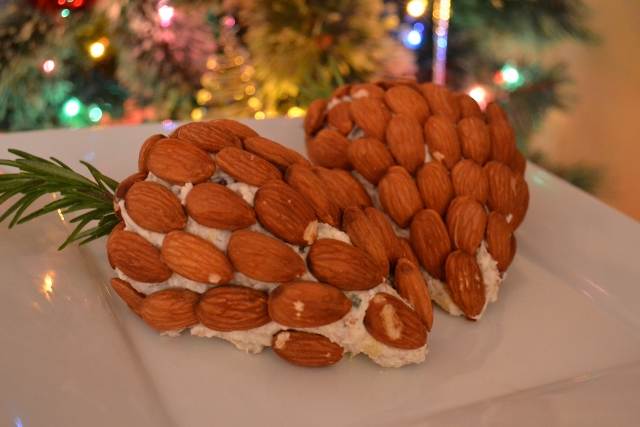
People like different types of cheese balls. My cheese ball does not have cheddar, it's a cream cheese base. It's usually popular at a party, but it's a little untraditional. Here's the final product with the Christmas tree in the background. Was I trying really hard to make it look more festive? Yes... don't judge.
Here's what you need to make the cheese ball:

- 1 (8oz) block of cream cheese
- 1 cup whole pecans
- 1 (8 oz) can pineapple tidbits
- 1 teaspoon chopped chives
- 3/4 teaspoon salt
- 1/8 teaspoon peppper
- Almonds to cover the cheese balls (not pictured)
Basically, you want to prepare all the ingredients and then combine them.
Set the cream cheese out so that it gets soft. When it's soft, put it in a mixing bowl.
Crush the pecans (or chop them if you don't have a crusher). Make them the consistency you want and then put them in the bowl.
Drain the pineapple tidbits and put them in the bowl.
Chop the chives to make them very fine. You may want more chives, but these chives were from my parent's herb garden and they were actually garlic chives. For that reason, they were very strong and I did not use as much. In the past, I've used more chives when I've just used regular chives.
Put the salt and the pepper in the bowl.
Now, with all the ingredients (except the almonds that you will use later), your bowl should look something like this:

Now take any rings that you have off your hands. You're getting ready to get messy. Mix up everything. Now it should look something like this...

Yum... right? No... I know it does not look great right now... that's why we're making it look like a pine cone. So, shape it into 2 pine cones...

After you're satisfied with the shape, cover them and put them in the refrigerator for at least a few hours. Mine were in the fridge for about 8 hours, but you want them in there long enough to get nice and firm.
When they are firm and you're just about ready to serve them, it's time to get the almonds ready. Turn the oven on to 400 degrees and put the almonds on a baking sheet. Bake them for about 5 minutes, take the pan out and shake them around and bake them again for about 5 minutes. The purpose of this is to just draw out more flavor from the almonds. When the almonds have cooled, it's time to decorate the cheese balls. Put them on there to try to make them look like pine cones!
When you've finished, stick some rosemary (what I used) out of the top. Or, if I had a real Christmas tree, I would have cut off a sprig and put that on the top of my cheese ball.

So that's it! And I just served it with wheat thins. O how I love to have an excuse to make tacky Christmas food :)

.jpg)
Comments
Post a Comment