Fried Okra
Fried okra is a southern summer specialty, which is why I love it! I love both fried squash and fried okra, but I've found that fried okra is easier for me and it's just a really simple thing to make overall. I just learned how to cook it this summer and I have to say that it's one of the EASIEST vegetables to cook. Is it healthy? In NO way is it healthy, but you just have to live a little. I can't imagine that it's any worse for you than french fries and we all know we eat french fries.
This recipe is made from a combo of advice from Lisa (my step-mom) and Kathryn (Lisa's mom). I asked both of them how they make fried okra and they both do it a little differently. The following recipe is how I do it and I'm sure it's just a little different than how they do it, but it's all good fried okra.
So you only need 6 ingredients and yet I forgot to put 2 of those ingredients in my picture. You probably have everything except the okra in your house already, so it's not an expensive recipe. Just refer to the list below:
 You will need:
Flour
White corn meal
Salt
Okra
1 egg
Vegetable oil
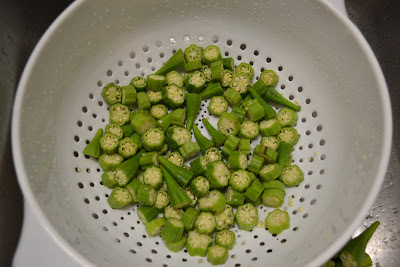
1. Start by washing the okra. When you pick out your okra, try to get the smallest okra because it's more tender. Sometimes the large okra can get dry and tough. So wash the okra and then cut into bite size pieces. Discard the tops. After you cut it up, throw it in a colander and then salt it. You just want to sprinkle the okra in salt and then mix it around with your hand to make sure that everything is covered. This is to sweat it out and season it at the same time. Leave the okra in the colander sweating for 20-30 minutes.
 2. While the okra is sweating, go ahead and make your batter mixture. How much you need depends on how much okra you have. You just want to put half flour and half corn meal on a plate and mix it together. Some people like it to be more corn meal than flour, but I like the 50/50 combo.
 3. When the okra is almost done sweating, go ahead at heat up the vegetable oil. You want to put enough oil in the pan so that the okra floats when it is frying. Heat the oil on low heat. I'm not going to lie - frying freaks me out. I always think that the oil is going to burst into flames and I'm going to run out of the house (hopefully with my cell phone) and call the fire department. Thankfully the fire department is literally just around the corner, so I can fry with confidence - knowing that the fire department can come and save my house if necessary.
 4. As the oil is heating, crack one egg over the okra and then mix the egg so that it covers all the okra. It's great to do this in a colander because any of the extra egg can just go through the bottom of the colander. I've cooked enough okra for 8 people and I've just used one egg for this process. It should be fine to use one egg for a small portion of okra or a large portion.
 5. After the okra is covered with egg, start taking the okra and cover the pieces in the flour/corn meal mixture. Just set it to the side with you're finished as you're waiting on the oil to be ready.
 6. When you think the oil is hot enough, throw in one piece of okra to test it. When it sizzles and bubbles around the okra, you know that the oil is ready. When this happens, go ahead and start throwing the okra in the pan. This is what it looks like when you start throwing the okra in the pan...
 7. Go ahead and fill up the pan. You don't want too many in the pan, but at the same time, you don't want to fry one piece at a time. Here's all my okra dancing around in the oil. This was enough okra for 4 people and I only had to do one batch in the pan. Sometimes I have to do 2-3 batches depending on how much I'm cooking. I stir it around every few minutes to make sure that all the pieces are cooking evenly, but I'm not sure that this is really necessary.
 8. I let my okra fry for 10-15 minutes. You may want it lighter or darker depending on your tastes. You can always take one piece out of the pan and taste it to see what you like. This is what mine looks like right before I take it out of the oil:
 9. I take it out with a slotted spoon and put it on a plate that is covered with a couple of paper towels. I do this because you just don't want your okra soaking in oil. You want crispy okra - not soggy okra. Here's what it looks like when you take it out:
 10. Yum. I'm ready to make it again! If the rest of your meal is not ready yet, make sure you keep the okra warm by putting it in a warming drawer or in your oven on low heat. You just want to keep it warm and crispy.
That's it! So easy! Try it this summer before the okra goes out of season. I'm thankful that my dad's garden supplies me with enough okra to make this as often as I want. I try to limit myself to making it only once a week at the most :)
This recipe is made from a combo of advice from Lisa (my step-mom) and Kathryn (Lisa's mom). I asked both of them how they make fried okra and they both do it a little differently. The following recipe is how I do it and I'm sure it's just a little different than how they do it, but it's all good fried okra.
So you only need 6 ingredients and yet I forgot to put 2 of those ingredients in my picture. You probably have everything except the okra in your house already, so it's not an expensive recipe. Just refer to the list below:

Flour
White corn meal
Salt
Okra
1 egg
Vegetable oil
1. Start by washing the okra. When you pick out your okra, try to get the smallest okra because it's more tender. Sometimes the large okra can get dry and tough. So wash the okra and then cut into bite size pieces. Discard the tops. After you cut it up, throw it in a colander and then salt it. You just want to sprinkle the okra in salt and then mix it around with your hand to make sure that everything is covered. This is to sweat it out and season it at the same time. Leave the okra in the colander sweating for 20-30 minutes.


That's it! So easy! Try it this summer before the okra goes out of season. I'm thankful that my dad's garden supplies me with enough okra to make this as often as I want. I try to limit myself to making it only once a week at the most :)

.jpg)
Comments
Post a Comment