Kathryn's Fried Apple Pies
Fall is in the air. Apples abound. This got me thinking that I should learn how to make my Grandma Kathryn's fried apple pies. I mean, anything fried is good, and this time of the year makes you want something with a little apple and cinnamon. Now you may think that all I do is eat "bad southern food," but I don't. First of all, I don't think that southern food is bad. Second, I don't eat this way all the time. Tonight I made healthy baked chicken, whole grain rice, broccoli, carrots, and grapes. Am I still a little hungry? Yes. Will I have a leftover fried apple pie with ice cream for dessert? I most certainty will. Don't lie to yourself - if you had a fried apple pie in your kitchen, you would want it too. Just look at it...
 Kathryn came over to my house last weekend to show me how you make them. You start with dried apples. I bought this bag of dried apples from the farmer's market. I got them from Cedar Hill Farms.
 You want to cook the apples in a large pot. Make sure they have plenty of water. This stage was hard to describe, so I tried to take a few pictures of the process. Get the water boiling and cover the pot to get it boiling faster, but make sure that once it boils, you turn the heat back down to where the apples are just simmering.
 As the apples start to cook, they expand. You will want to add more water when they expand. They need lots of water.
 Now they are starting to get softer. You want soft apples.
 Now they are just about there. We would stir them and poke them with a fork to make sure that they were very tender.
 Once we decided that they were tender, we stopped adding water because we wanted to cook the water out of the apples. We stirred a lot in this stage because we did not want the apples to stick as we were getting rid of the water. We were looking for just about the consistency of apple sauce. It took about 70 minutes to do this process, but the time depends on how many apples you have and the temperature and all that. You have to go off the look and feel of the apples.
 After they finish cooking, you have to let them cool completely. We came back to the apple pies after about 3 hours, but I'm sure that the apples were cool before then. The next step is to add the sugar.
 I can't tell you how much sugar we added. We started with about a cup and then tasted it. We decided that it needed a little more, so we added a little more. It all depends on how sweet you want them and on how many apples you had to start with.
We also added "Apple Pie Spice." I happened to have this in my pantry, but Apple Pie Spice is just a combination of cinnamon, all spice, and nutmeg. We added about a teaspoon and were satisfied. Again, you just have to taste it to see what you want.
After the apples were ready, it was time to make the crust. These are the ingredients for the crust:
- 3 cups all purpose flour
- 1/2 teaspoon baking soda
- 1/2 teaspoon salt
- 1 tablespoon baking powder
- 1/2 cup shorting
- 1 egg
- 1 cup buttermilk
Mix up all the ingredients and you have your crust for your pies.


 We decided to fry outside because I don't have great ventilation in my kitchen. Actually, I'll be honest, I don't have ANY ventilation from my kitchen. That might be a home improvement project one day, especially if Ray wants fried food more often than the rare occasion. Anyway, we put vegetable oil in an electric fryer and set the temperature to 375.
 We could fit 4 at a time.
 They do not take long at all to fry. In fact, we burned parts of the first batch. If this happens, they are not bad, just take a knife and scratch off the burned parts.
 Remember to fry the sides of the pies too -
 Look how beautiful -
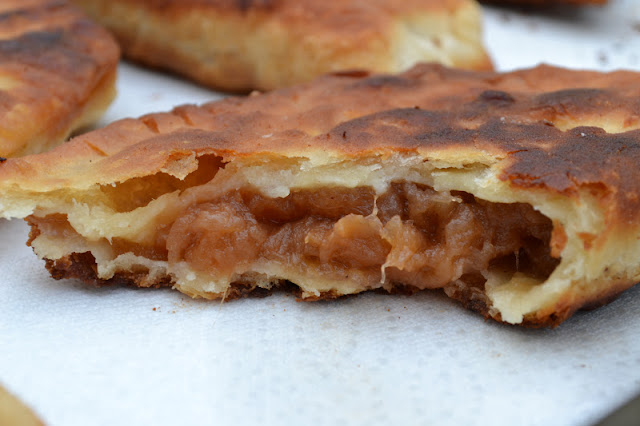
 And yep, these are my teeth marks. I took a picture after eating half of it -
There's nothing like a FRESH apple pie. It's so much better right out of the fryer than having it the next day. The next day will do, but it's awesome when it's fresh.
Learning how it's all done -
 And the two of us with the final product -
 What a fun Saturday! Thanks, Kathryn for teaching me!


We also added "Apple Pie Spice." I happened to have this in my pantry, but Apple Pie Spice is just a combination of cinnamon, all spice, and nutmeg. We added about a teaspoon and were satisfied. Again, you just have to taste it to see what you want.
After the apples were ready, it was time to make the crust. These are the ingredients for the crust:
- 3 cups all purpose flour
- 1/2 teaspoon baking soda
- 1/2 teaspoon salt
- 1 tablespoon baking powder
- 1/2 cup shorting
- 1 egg
- 1 cup buttermilk
Mix up all the ingredients and you have your crust for your pies.

Grab some crust and start making a circle. You can roll it out to help. The circle does not have to be perfect. Just make it the size you want for your pies.

Put some apples in the middle -

Fold it over and use your super cool pastry cutter that your mother-in-law gave you (ok, maybe you don't have a cool pastry cutter, that's ok too), to cut the edges. Then press the edges together with a fork.

Repeat several times and put them on a pan to get ready to fry.


Learning how it's all done -


My mouth is watering looking at these pics! YUM!! This is my fav treat that we would always get at the fall festival. So fun that now you know all of the tricks to making perfect apple pies!
ReplyDelete